Build a DIY pipe dream of a table
Growing up, I spent a lot of time in my dad’s workshop. He had a huge room filled with every tool imaginable, and boxes and boxes of really cool cast-off items. I would often spend a day rummaging through these to see what I could make of them. My favourite was a big crate filled with old metal plumbing parts. I could screw them all together in different configurations to make shapes and sculptures, then take them apart and start over – sort of like industrial Lego.
Not much has changed. I now have a shed and a workshop filled with all sorts of saved and salvaged items. Every now and then I play around with them and see what I can come up with.
We needed a new coffee table for our narrow living room (just like many city houses have) and I wanted something industrial and rustic looking. I found the perfect solution with industrial gas pipe.
This is a simple DIY project that can be easily customized to build any size of table. The pipe comes threaded so all you do is screw it all together – no tools required except a screwdriver to attach the pipe base to your wood top.
Gas piping comes in galvanized or black and you can use either one for a different look. The black pipe comes coated with an oil to stop corrosion. I like to wash them in soapy water first to get rid of this. If you do this, you MUST spray the pipes with clear-coat urethane to stop corrosion after it’s been washed and dried. If rust forms after the pieces are dry, clean with steel wool before spraying with the clear coat.
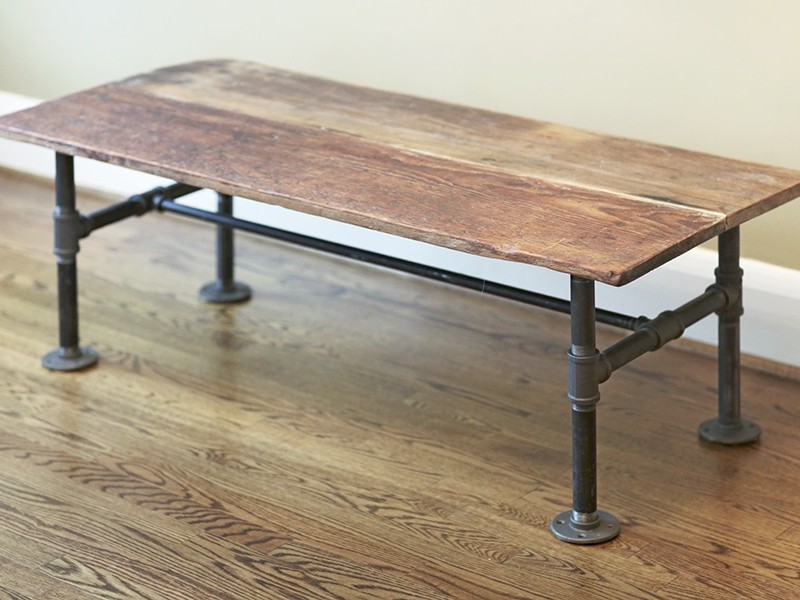
The main parts for the table will be the wood top (I prefer reclaimed wood but you could use new) and different lengths of pipe, T-connectors, reducers, and flanges for the ends of the legs. I used 1” pipe but you can use 3/4” if you prefer a less chunky look. I did use 3/4” pipe for my long support between the legs. This support is optional, but it will add to the stability and strength of the table so I recommend including it. You can use the same diameter pipe for the support, but I find it looks better to make this section slightly smaller so I used T-connectors with reducers in them.

Use the top of an old trunk for a different look.
PHOTO: Christine Roberts
First you need to figure out the finished size of your wood table top and work backwards to create the base. I like the metal base to sit in about 3” from the sides and about 6” from the long ends, so deduct that from the overall length and width of your wood top to get the size of base you need. Generally coffee tables are about 18” high, but again you can customize this by purchasing longer or shorter sections of pipe. I used 4”, 6” and 8” sections for mine. You can use any size you need to make the correct size base for your own table. Remember to subtract the thickness of the wood top when calculating the length of leg needed.
To make the legs I started with a flange for the foot, screwed on an 8” section of pipe, then a T-connection, a 6” section of pipe into that, and another flange for the top (this will allow you to easily screw onto the wood top). Make four identical legs. Next, connect each pair of legs to form an ‘H’ shape by screwing a length of pipe into the T-connection of one leg, then a T-connection with reducer in the middle (for your thinner support along the length), and another length of pipe into the other leg.
You should now have two ‘H’-shaped leg supports, with a T-connector/reducer in the middle. The only thing to do now is to connect these two leg supports with your length of smaller pipe.
HINT: if the ready-cut sections of pipe available for this part aren’t the right length for your desired size of table base, you can have a custom length cut and threaded for you in most supply stores.
Now set the table top upside down and place the base onto it so it’s centered. The flanges come with holes in them, so just screw them onto the wood top and you’re finished!
You now have a custom table that is unique, sturdy and really easy to make. You can even add a shelf below if you want more storage. You can use these basic instructions to make any size and height of table for your home. For a really great table, find a vintage trunk or suitcase from a flea market or antique shop: built-in storage AND a table!
You can also use this type of piping for many other things. It can be used for shelving, curtain rods and is perfect for creating a custom closet with hanging rods and shelving combined. It’s inexpensive, easy to work with and readily available at any building supply store.